noxma forum

Would you like to react to this message? Create an account in a few clicks or log in to continue.
noxma forum

noxma forum description


    Shiny app guide

    avatar
    Admin
    Admin


    จำนวนข้อความ : 33
    Join date : 09/12/2017

    Shiny app guide Empty Shiny app guide

    ตั้งหัวข้อ by Admin Mon Dec 11, 2017 5:20 pm

    Funtion input

    Shiny app guide Captur10
    avatar
    Admin
    Admin


    จำนวนข้อความ : 33
    Join date : 09/12/2017

    Shiny app guide Empty Re: Shiny app guide

    ตั้งหัวข้อ by Admin Mon Dec 11, 2017 5:23 pm

    Shiny app guide Captur11
    avatar
    Admin
    Admin


    จำนวนข้อความ : 33
    Join date : 09/12/2017

    Shiny app guide Empty Re: Shiny app guide

    ตั้งหัวข้อ by Admin Mon Dec 11, 2017 5:26 pm

    Shiny app guide Captur12
    avatar
    Admin
    Admin


    จำนวนข้อความ : 33
    Join date : 09/12/2017

    Shiny app guide Empty Re: Shiny app guide

    ตั้งหัวข้อ by Admin Mon Dec 11, 2017 5:29 pm

    Shiny app guide Captur13
    avatar
    Admin
    Admin


    จำนวนข้อความ : 33
    Join date : 09/12/2017

    Shiny app guide Empty Re: Shiny app guide

    ตั้งหัวข้อ by Admin Mon Dec 11, 2017 5:31 pm

    Shiny app guide Captur14
    avatar
    Admin
    Admin


    จำนวนข้อความ : 33
    Join date : 09/12/2017

    Shiny app guide Empty Re: Shiny app guide

    ตั้งหัวข้อ by Admin Mon Dec 11, 2017 5:47 pm

    Shiny app guide Captur15

    Shiny app guide Captur17

    Shiny app guide Captur18

    Shiny app guide Captur21

    Shiny app guide Captur19

    Shiny app guide Captur20

    Shiny app guide Captur16

    Shiny app guide Captur22

    Shiny app guide Captur23

    Shiny app guide Captur24

    Shiny app guide Captur27

    Shiny app guide Captur29
    avatar
    Admin
    Admin


    จำนวนข้อความ : 33
    Join date : 09/12/2017

    Shiny app guide Empty Re: Shiny app guide

    ตั้งหัวข้อ by Admin Mon Dec 11, 2017 6:10 pm

    Shiny app guide Captur30

    Shiny app guide Captur31

    Shiny app guide Captur32
    avatar
    Admin
    Admin


    จำนวนข้อความ : 33
    Join date : 09/12/2017

    Shiny app guide Empty Install shiny server

    ตั้งหัวข้อ by Admin Mon Dec 11, 2017 6:27 pm

    Step 1 — Installing Shiny

    The su - runs the following command as if in the user's own environment, and the -c option specifies the command that will be run. That command, in this case, is what follows in double quotes.

    The install.packages is the R command used to install R packages. So, in this command specifically, the shiny package is installed from the specified repository.

    $ sudo su - -c "R -e \"install.packages('shiny', repos='http://cran.rstudio.com/')\""


    When complete, R will tell you that the installation is DONE and where it put the downloaded source packages
    -------------------------------------------------------------------------------------------
    ** testing if installed package can be loaded
    * DONE (htmltools)
    * installing *source* package ‘shiny’ ...
    ** package ‘shiny’ successfully unpacked and MD5 sums checked
    ** R
    ** inst
    ** preparing package for lazy loading
    ** help
    *** installing help indices
    ** building package indices
    ** testing if installed package can be loaded
    * DONE (shiny)

    The downloaded source packages are in
    ‘/tmp/RtmpSCHhgg/downloaded_packages’
    >
    >
    ------------------------------------------------------------------------------------------


    Step 2 — Installing Shiny Server


    Per Shiny Server's official installation instructions, we'll use wget to download a pre-built binary for 64-bit architecture. Because Shiny Server is in active development, you should consult the official Shiny Server download page to get the URL for the latest 64bit, pre-built binary matching your operating system. Once you have the address, change the URL in the following command accordingly.

    $ wget https://download3.rstudio.org/ubuntu-12.04/x86_64/shiny-server-1.5.6.875-amd64.deb

    Once the file is downloaded, verify its integrity by comparing the output of the following command with the MD5 checksum listed on the RStudio Shiny Server download page at the top of 64bit, pre-built binary download instructions.

    md5sum shiny-server-1.5.5.872-amd64.deb
    Output :
    de039a6f9e055de693524e6cb44f6a03  shiny-server-1.5.6.875-amd64.deb


    Because Shiny Server depends on GDebi — a tool that installs local deb packages while simultaneously resolving and installing additional dependencies — for its installation, you'll need to update your package list and then install the gdebi-core package next.

    sudo apt-get update
    sudo apt-get install gdebi-core


    You're now ready to install Shiny Server.

    sudo gdebi shiny-server-1.5.5.872-amd64.deb

    Type y when GDebi asks you to confirm that you want to install the package.

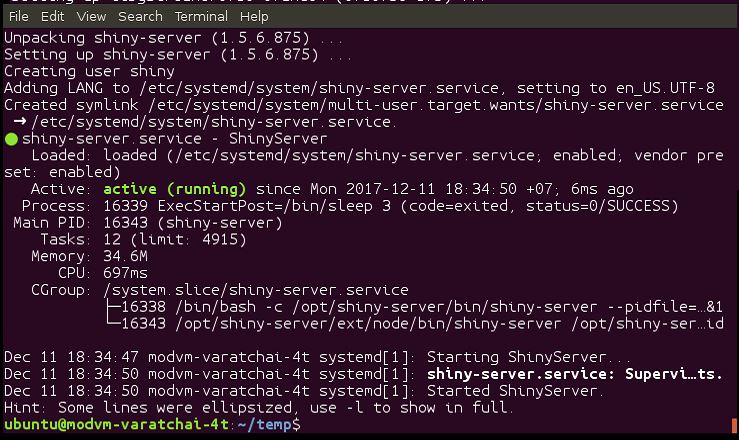
    At this point, the output should indicate that a service named ShinyServer is both installed and an active Systemd service. If the output indicates that there's a problem, re-trace your previous steps before continuing.

    Shiny app guide Captur33

    Next, verify that Shiny Server is indeed listening on port 3838.

    $ sudo netstat -plunt | grep -i shiny

    If your output doesn't look like this, double-check your terminal for additional warnings and error messages.

    Now, modify the firewall to allow traffic through to Shiny Server.

    $ sudo ufw allow 3838

    Finally, point your browser to http://www.example.com:3838 to bring up the default Shiny Server homepage, welcoming you to Shiny Server and congratulating you on your installation.

    You now have both Shiny and Shiny Server installed and tested, so let's secure the setup by configuring Nginx to serve as a reverse proxy and route all traffic over HTTPS.
    avatar
    Admin
    Admin


    จำนวนข้อความ : 33
    Join date : 09/12/2017

    Shiny app guide Empty Re: Shiny app guide

    ตั้งหัวข้อ by Admin Mon Dec 11, 2017 6:46 pm

    Step 3 — Securing Shiny Server with a Reverse Proxy and SSL Certificate
    In this step, you'll configure Nginx to forward incoming requests to Shiny Server by way of WebSocket, a protocol for messaging between web servers and clients.

    Because we want to create configuration variables that any Nginx server block can use, open the main Nginx configuration file, nginx.conf, for editing.

    $ sudo nano /etc/nginx/nginx.conf


    Step 4 — Hosting Interactive R Documents
    Shiny Server is useful not only for hosting Shiny applications but also for hosting interactive R Markdown documents.

    At this point, you have a working Shiny Server that can host Shiny applications, but it can't yet host interactive R Markdown documents because the rmarkdown R package isn't installed.

    So, using a command that works like the one from Step 1 for installing the Shiny package, install rmarkdown.

    sudo su - -c "R -e \"install.packages('rmarkdown', repos='http://cran.rstudio.com/')\""

    Then, verify the installation by going to https://example.com/sample-apps/rmd/. You should see an interactive R Markdown document in your browser. Additionally, if you return to https://example.com, the error message you received earlier should now be replaced with dynamic content.

    If you receive an error message, follow the on-screen instructions and review your terminal output for more information.

    Your Shiny Server setup is complete, secured, and ready to serve both Shiny applications as well as Interactive R Markdown documents.
    avatar
    Admin
    Admin


    จำนวนข้อความ : 33
    Join date : 09/12/2017

    Shiny app guide Empty Server Log

    ตั้งหัวข้อ by Admin Mon Dec 11, 2017 6:56 pm

    By default, the log is stored in /var/log/shiny-server.log


    Default appliaction :
    You can delete this page by running sudo rm /srv/shiny-server/index.html or delete the sample applications by running sudo rm -rf /srv/shiny-server/sample-apps.

      เวลาขณะนี้ Sat Apr 27, 2024 2:57 am